Best ComfyUI Workflows: Templates, Examples, and Downloads
 Leah Childers
What is a ComfyUI Workflow?
ComfyUI workflows are reusable node graphs that let you run image, video, audio, upscaling, inpainting, ControlNet, LoRA, and other generative AI pipelines without rebuilding every node from scratch.
The best ComfyUI workflow depends on what you are trying to do. A beginner may want a simple text-to-image or image-to-image template. A production team may need a larger workflow with ControlNet, IPAdapter, face detailing, upscaling, and video generation. This guide collects useful ComfyUI workflows, explains what each one does, and shows where to find workflow templates and examples you can download or load into ComfyUI.
How to Download and Use ComfyUI Workflow Templates
There are three common ways to load a ComfyUI workflow:
- Use the built-in template browser. In ComfyUI, open Workflow -> Browse Workflow Templates. This is the easiest place to start because official templates can check for missing models and prompt you to download required files.
- Drag a workflow JSON file into ComfyUI. Many community workflows are shared as .json files. Download the file, open ComfyUI in your browser, and drag the JSON onto the canvas.
- Drag an image with embedded workflow metadata into ComfyUI. Many ComfyUI example images contain the full workflow metadata used to generate them. If the image includes metadata, dragging it into ComfyUI will reconstruct the node graph.
If a workflow fails to run, the most common cause is a missing model, custom node, or checkpoint. Install ComfyUI Manager if you frequently use community workflows, because it can help identify and install missing custom nodes.
Best ComfyUI Workflows by Use Case
| Workflow | Best for | Difficulty | Custom nodes |
|---|---|---|---|
| Img2Img | Editing an existing image with a prompt | Beginner | No |
| Inpaint | Regenerating part of an image | Beginner | No |
| Outpaint | Expanding an image beyond its borders | Beginner | No |
| SUPIR + ESRGAN Upscaling | High-resolution restoration and upscaling | Advanced | Yes |
| 2-Pass Pose ControlNet | Controlled human poses and composition | Intermediate | Usually no or limited |
| NVIDIA Cosmos Video | Text/image-to-video generation | Intermediate | No |
| Stable Audio Open | Text-to-audio generation | Beginner | No |
| LoRA Workflow | Applying custom styles or subjects | Beginner | No |
If you are new to ComfyUI, start with the built-in Img2Img, Inpaint, Outpaint, or LoRA templates. If you are building production workflows, the more advanced examples are useful because they show how to combine model loading, conditioning, upscaling, and post-processing into a repeatable graph.
Image Workflows
Img2Img (Default ComfyUI Workflow)
What it does: Takes an existing image and transforms it with the user’s prompts.
Why it’s useful: Easy to use and allows more refinement than text prompts alone. Can also be used iteratively for fine-tuning edits.
Extra components: Only uses core ComfyUI nodes.
The Img2Img workflow can be found in the Templates menu:
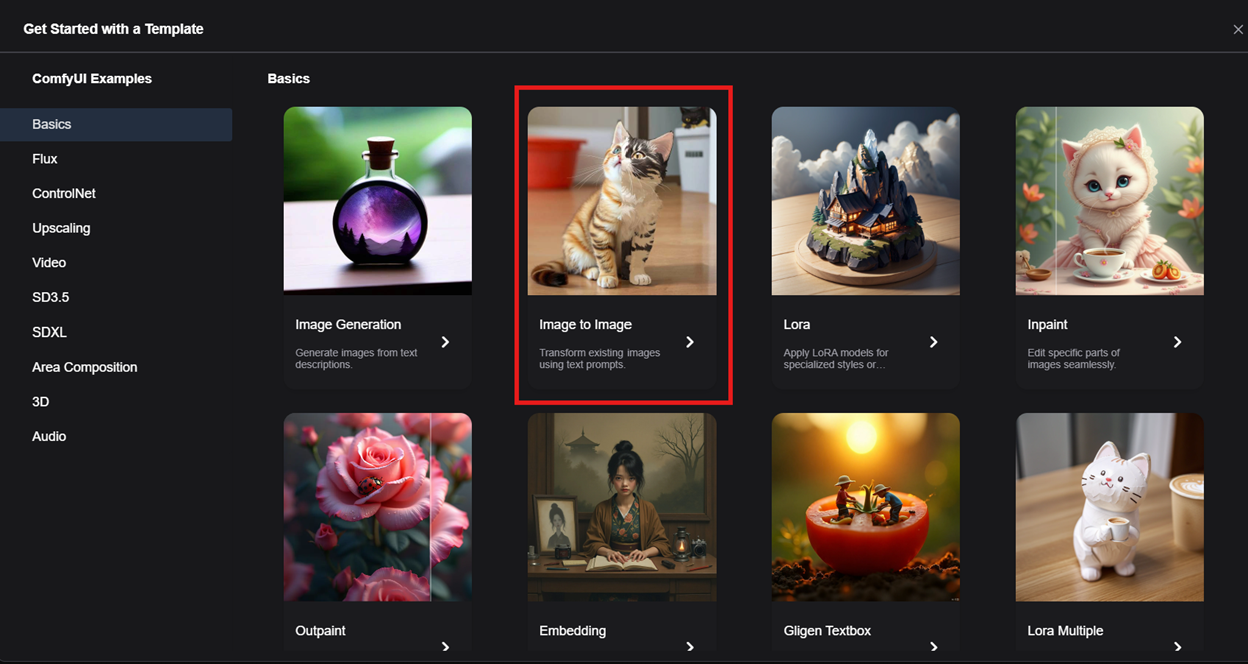
When using the default Txt2Img workflow, the KSampler node receives a latent made of random noise and denoises it to fit the prompt. The Img2Img workflow replaces the Empty Latent Image node with the Load Image node and denoises a real image to fit the prompt, allowing the user to steer and guide the generation.
The ComfyUI Github includes a repository of examples; one of the examples is the Img2Img workflow using a sketch of the end goal of the generation. To show how the loaded image guides the generated image, we’ve drawn a different sketch but kept the rest of the parameters exactly the same to see how the different loaded images shape the output.
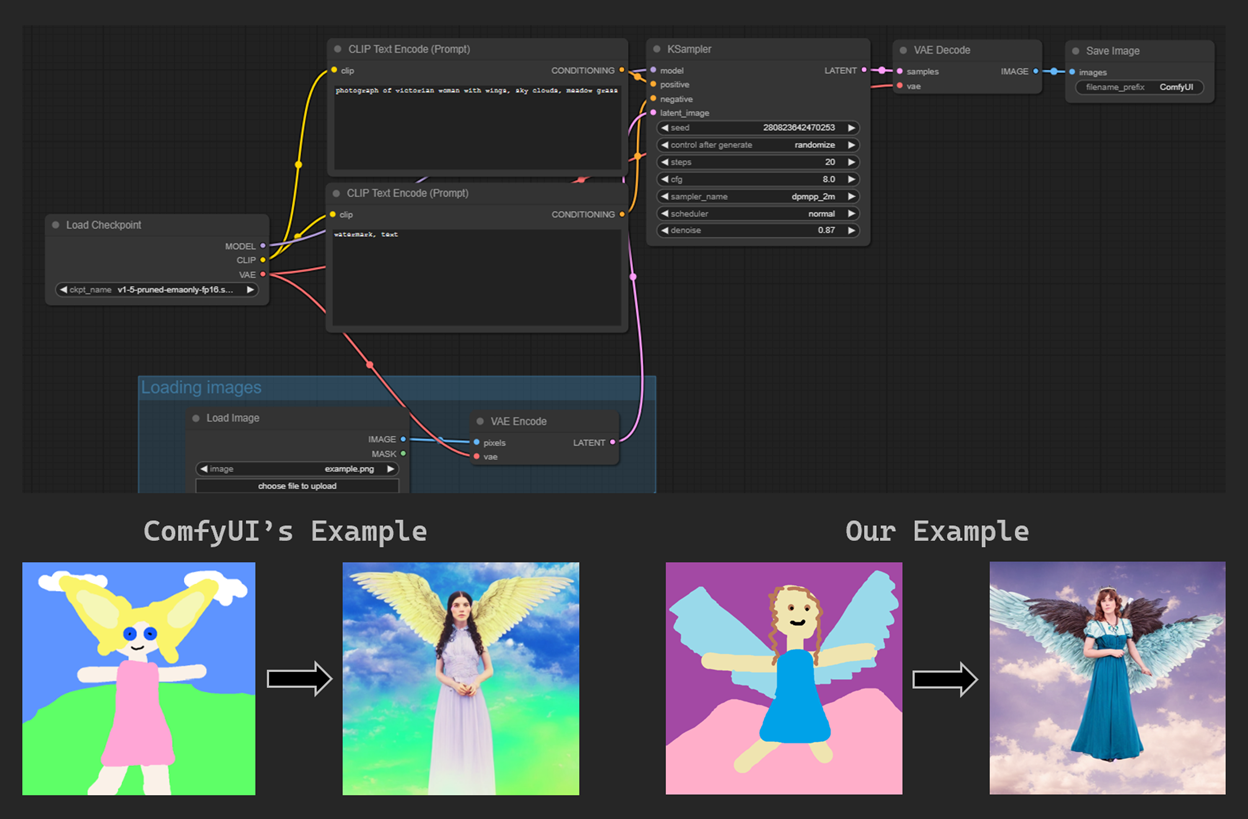
This generation wasn’t perfect, but each sketch clearly guided the output in a different way, which is seen most clearly with the colors of each sketch.
This is one of the best first workflows to try because it teaches the core ComfyUI pattern: load an input, condition the model with a prompt, and control how strongly the output should follow the original image.
Inpaint (Default ComfyUI Workflow)
What it does: Selectively modifies only smaller parts of an image by defining an area to regenerate while retaining the rest of the image.
Why it’s useful: Better precision in modifying and repairing images.
Extra components:
- Nodes: Only core nodes
- Models: Download 512-inpainting-ema.safetensors from Hugging Face or when prompted by the application.
Using the Inpaint workflow involves loading an image and then using the Mask Editor to remove the portion to be regenerated. Here is an example usage of the workflow:
- Load the image in the Load Image node.
- Right click on the image and click MaskEditor.
- Use the tools on the right to remove the portion of the image that you want to regenerate, then hit Save.
- Run!
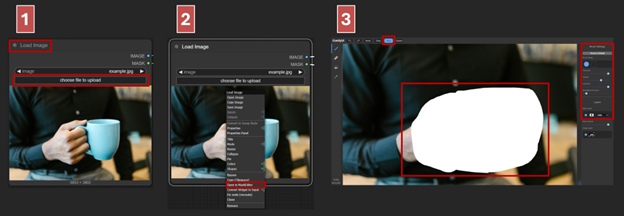
Use this workflow when you want targeted edits instead of regenerating the whole image. It is especially useful for fixing hands, replacing objects, cleaning backgrounds, or changing small regions while keeping the original composition.
Outpaint (Default ComfyUI Workflow)
What it does: Expands an image by extending the canvas in any direction and generating new content in the new space.
Why it’s useful: Extending scenes is useful for many purposes including resizing images, adding environmental details, and panoramas.
Extra components:
- Nodes: Only core nodes
- Models: Download 512-inpainting-ema.safetensors from Hugging Face or when prompted by the application.
The Outpaint workflow is almost identical to the Inpaint workflow, except that the masking is done with help from the Pad Image for Outpainting node. In this node, you can specify how many pixels in each direction you want to expand the image (“padding”), as well as set a feathering parameter which controls the number of pixels of smooth transition between the original image and the padding.
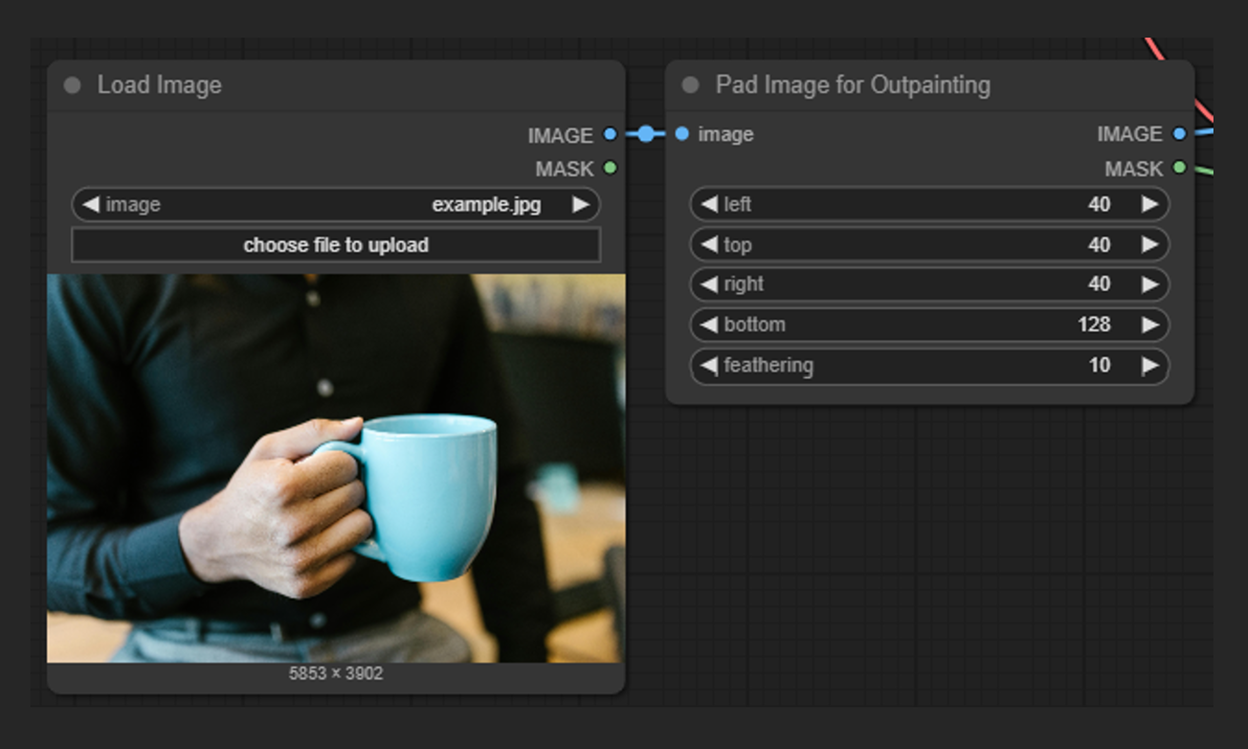
Outpainting is a good fit when you need a different aspect ratio for a generated image, such as turning a square image into a banner, expanding a product shot, or creating a wider scene from a portrait image.
Upscaling: Hybrid SUPIR + ESRGAN Workflow
While ComfyUI has a default Upscaling workflow using only ESRGAN models, but this hybrid workflow, while more difficult to setup and use as a beginner, is more powerful and allows more prompt guidance.
If you’re having trouble setting up this hybrid workflow, try the default Upscaling workflow from the ComfyUI templates first.
What it does: Upscales an image in two stages.
- Stage 1: Uses SUPIR (Scaling-Up Image Restoration) to upscale the image to 2K or 4K resolution. SUPIR can be guided by positive and negative prompts but can be quite slow.
- Stage 2: Gives SUPIR’s output to an ESRGAN model to upscale quickly to 8K or 16K.
Why it’s useful: Combines photorealism and detail restoration strengths of both SUPIR and ESRGAN models while balancing for resource usage and runtime. Also allows prompt guidance during the SUPIR stage.
Extra components:
- Workflow graph: Download the graph from OpenArt.
- Custom nodes, models, and checkpoints:
- SUPIR: Install the SUPIR wrapper from Github and download the model checkpoints.
- Download Quick ESRGAN models from OpenModelDB. The OpenArt workflow recommends
4xLSDIRplusC,16x-ESRGAN, and1x_Plants_400000_Gbased on the domain of the image being upscaled, but these can be replaced with other ESRGAN models. - Install custom nodes: Impact Pack and KJNodes
- LoRAs: None by default, but SUPIR can support LoRAs with SDXL
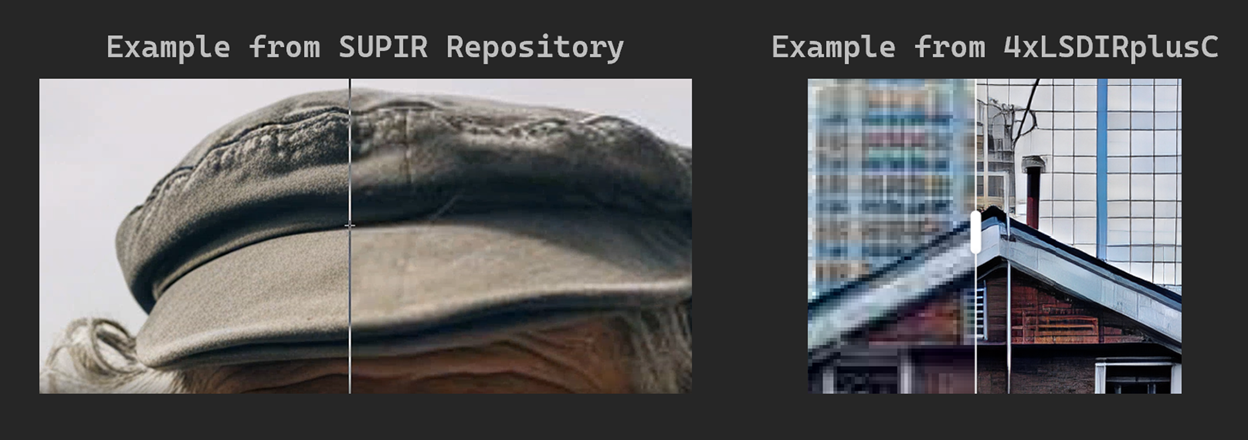
Because this workflow can be slow and memory-heavy, it is a better fit for high-value final images than for fast iteration. If you are testing prompts, generate smaller previews first and run the full upscaling workflow only after you have a result worth preserving.
2-Pass Pose ControlNet (Default ComfyUI Workflow)
What it does: Splits human posing in images into two phases:
- First pass: Incorporates OpenPose to generate an image conforming to the desired pose.
- Second pass: Uses the first image as the initial latent and adds more detail and stylization.
Why it’s useful: Refined control over the people in the image, better detail control, and the two phases allow for higher resolution and style blending.
Extra components: Either install the missing models when prompted by the application, or manually install them from this page of the ComfyUI documentation
Visit the ComfyUI documentation for a full tutorial on how to use this complex workflow. The crux of this workflow is loading an OpenPose skeleton map in the Load Image node, as shown below:
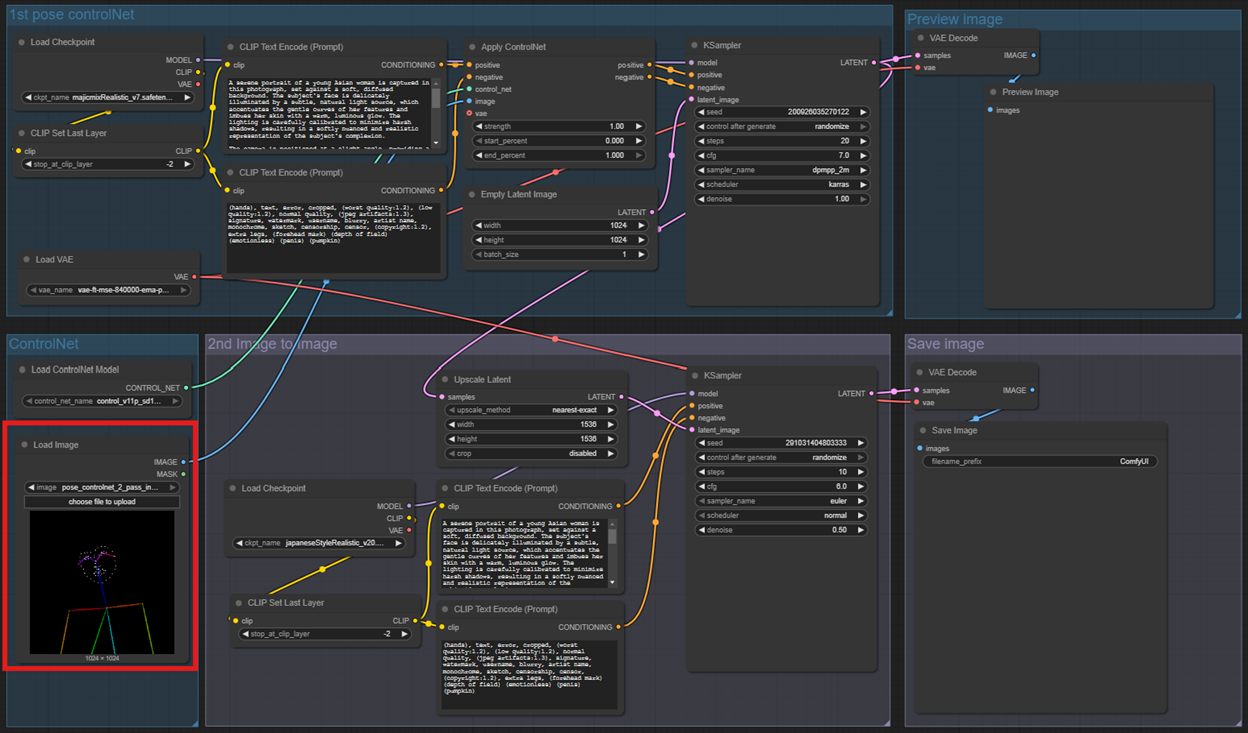
This workflow is a strong choice when pose accuracy matters more than raw prompt creativity. It is useful for character images, fashion/editorial shots, and any workflow where body position or composition needs to be controlled.
Video and Audio Workflows
In this section, we’ll briefly discuss some of the popular workflows for other types of media including video, audio, and music.
NVIDIA Cosmos Text/Image to Video
NVIDIA’s Cosmos models were introduced earlier this year and designed to emphasize physics consistency and fluid motion. The following workflows allow you to use NVIDIA’s powerful models in ComfyUI:
NVIDIA Cosmos Text to Video
What it does: Generates video from positive and negative prompting using NVIDIA’s Cosmos models.
Why it’s useful: Easy to use with less setup than other similar workflows, good support for negative prompting, good for physics awareness, very memory-efficient VAE.
Extra components:
- Workflow graph: Download from this page of the ComfyUI examples
- Nodes: Only core nodes
- Models and weights:
- Model: Cosmos-1_0-Diffusion-7B-Text2World
- Text Encoder: oldt5_xxl_fp8_e4m3fn_scaled
- VAE: cosmos_cv8x8x8_1.0
NVIDIA Cosmos Image to Video
What it does: Generates video from positive and negative prompting using NVIDIA’s Cosmos models, starting with an image to generate the video latent.
Why it’s useful: Easy to use with less setup than other similar workflows, good support for negative prompting, good for physics awareness, very memory-efficient VAE.
Extra components:
- Workflow graph: Download from this page of the ComfyUI examples
- Nodes: Only core nodes
- Models and weights:
- Model: Cosmos-1_0-Diffusion-7B-Video2World
- Text Encoder: oldt5_xxl_fp8_e4m3fn_scaled
- VAE: cosmos_cv8x8x8_1.0
This ComfyUI examples page as well as this ComfyUI Blog post have many tips and examples for the Cosmos workflows. Here are a few of the important tips:
- Best at 121-frame videos.
- Best when text prompts are long (multiple sentences), because the model struggles to adhere to shorter prompts.
- Resolution should be at least 704x704.
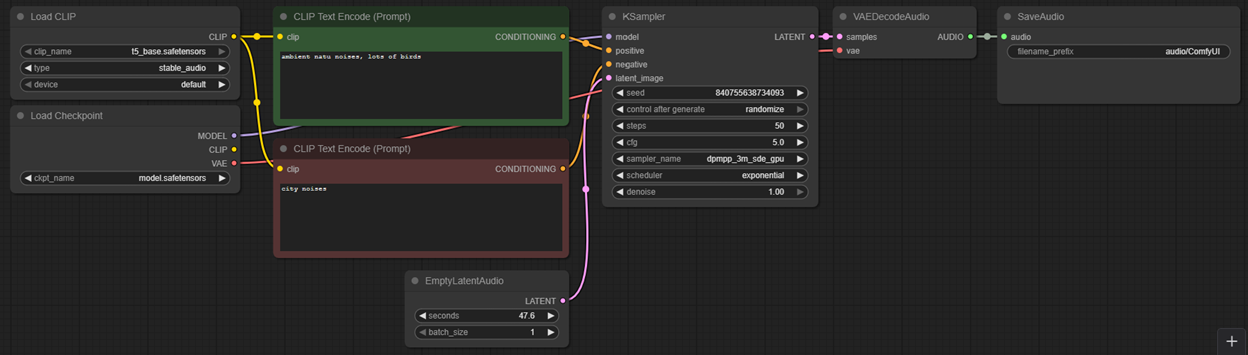
Stable Audio Open (Default ComfyUI Workflow)
What it does: Generates short audio clips from text prompts
Why it’s useful: Easy setup, positive and negative prompting
What audio can be generated:
- Audio effects (ambient noise, nature sounds, animal noises, etc)
- Short music clips
- Not meant for intelligible speech
Extra components:
- Models:
t5_baseandstable_audio_open_1.0which can be downloaded here.
Rhythmix Workflow
What it does: Generates film-score-style music compositions that match user-inputted visual content.
Why it’s useful: Video input, highly customizable text prompts, specialized for music
What audio can be generated: Primarily focused on music
Extra components:
- Workflow graph: Download from Rhythmix’s OpenArt page
- Custom nodes: There are many (over 40) custom nodes necessary for this very complex workflow. The easiest way to get a complete list is by dragging the above workflow into ComfyUI and downloading each missing node when prompted.
Basic LoRA Workflow
A LoRA (Low-Rank Adaptation) is a lightweight fine-tuning method that adds small differences into larger models. It is an added “layer” that modifies part of the output. Below is the default LoRA workflow for text-to-image generation, although LoRAs can be incorporated into the generation for any type of media.
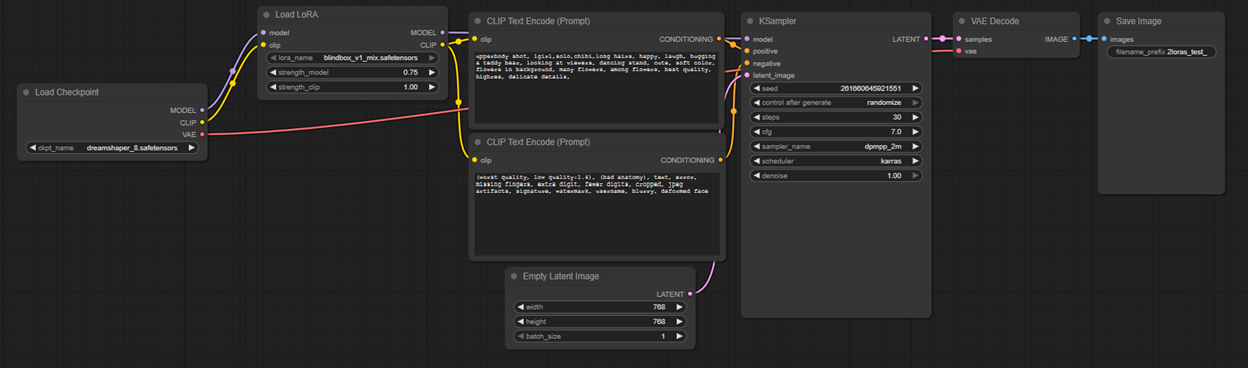
What it does: Incorporates a LoRA into the default text-to-image workflow.
Why it’s useful: Allows more customization and without having to install full models for every style.
Extra components: Default ComfyUI template using only core nodes, but you will want to download the LoRAs for your purposes.
The ComfyUI documentation has a good page on how to use the basic LoRA workflow, and you can download LoRAs on CivitAI. LoRAs are model-dependent because they add deltas (differences) to a specific model, so make sure you check which base model the LoRA modifies. Some examples of popular purposes of LoRAs include:
- Photorealism
- Mimicking known art styles (such as anime, cartoons, specific artists, etc)
- Adding more details
Where to Find More ComfyUI Workflow Examples
The ComfyUI ecosystem changes quickly, so the best workflow sources are usually a mix of official examples and community collections:
- Official ComfyUI examples: good for learning core workflows and loading images that contain embedded workflow metadata.
- ComfyUI workflow templates: useful for built-in templates and workflows that can prompt for missing model downloads.
- Comfy.org workflows: a browsable gallery of community workflows and templates.
- GitHub workflow collections: useful for advanced or niche workflows, but always check required custom nodes and models before running them.
When evaluating a community workflow, check when it was last updated, whether the required custom nodes are maintained, and whether the workflow depends on models you can still download.
Running ComfyUI Workflows in the Cloud
Many ComfyUI workflows are easy to test locally but become harder to run when they require large models, video generation, upscaling, or repeated batch jobs. Workflows that use SUPIR, Cosmos, FLUX, ControlNet, or multiple custom nodes can quickly run into local GPU memory limits.
For heavier workflows, a cloud GPU setup is often simpler. You can keep the same ComfyUI workflow graph, install the required models and custom nodes in a reproducible environment, and run generation jobs on larger GPUs when needed. This is especially useful for video workflows, upscaling workflows, and production pipelines where repeatability matters.
If you are comparing local and cloud setups, the main questions are: how much VRAM the workflow needs, how often you will run it, whether the model files are easy to cache, and whether you need repeatable results across a team or product. For cost planning, compare expected runtime against GPU pricing.
Takeaways
The best ComfyUI workflow is the one that matches your task. Start with built-in templates if you are learning, then move to community workflows when you need more specialized pipelines for upscaling, pose control, video, audio, or production automation.
For most users, the highest-leverage habit is to save and reuse workflows once they produce reliable results. A good workflow turns a one-off generation experiment into a repeatable system that can be improved, shared, and run again later.
If a workflow is slow locally or requires larger models than your machine can handle, move the same graph to a cloud GPU environment and cache the models there. That lets you keep the flexibility of ComfyUI while avoiding local hardware limits.