How to Use ComfyUI
 Leah Childers
What is ComfyUI?
ComfyUI is a powerful open-source UI designed for creating and executing complex workflows for image, video, and audio generation models. The modular GUI setup allows users to visually manage and interact with their AI pipelines without extensive coding knowledge, minimizing the learning curve to building SOTA image and video generation apps
For those not yet familiar, a node-based UI is an interface where users can drag and connect visual blocks (nodes) representing processes and modules, contrasting more traditional slider-and-panel UIs. In ComfyUI, each node is a discrete operation such as data pre-processing, model inference, or image transformation. The visual connections between the nodes form a pipeline determining how the content is generated and manipulated. This visual clarity can help both beginners and experts understand, tweak, and troubleshoot complex workflows.
Quick-Start Guide for Running ComfyUI
ComfyUI can be installed on most modern computers and it can also be run on cloud platforms. ComfyUI is very resource-intensive and may not run smoothly, or at all, on some systems, so the easiest way to get started with ComfyUI as a newcomer is to make use of Beam’s free $30of compute time. Launching ComfyUI on Beam takes less than a minute and involves none of the setup of hosting the program locally, so it is a perfect way to start using the program before committing to either paid compute time or installing ComfyUI locally.
Below are brief guides to deploying remotely and locally.
Running ComfyUI Remotely
- Beam: The quickest way to get started with ComfyUI is launching it on Beam. Make an account, complete the onboarding (optional), navigate to Templates, and select “Launch” on ComfyUI. You can toggle the hardware used to optimize for compute time and cost.
- Make sure you stop the container at the end of the session!
- Google Colab: In the repository, ComfyUI includes a Jupyter notebook with instructions for use on Google Colab, a cloud platform for running Jupyter notebooks with both free and paid access to GPUs and TPUs.
Installing ComfyUI
Below is a brief guide for newcomers ready to install ComfyUI locally. While ComfyUI highly recommends a dedicated GPU, each installation method still works in CPU mode, sacrificing substantial time and potentially making the software unusably slow.
The following instructions are intended for GPU use, however if you want to install on a machine with no GPU, this article goes in depth on the installation process for every case, and you can always check out ComfyUI’s Github and documentation.
System Requirements
- Operating system:
- Windows: 10/11
- macOS: 12.3 or later
- Linux: most modern distributions
- GPU:
- Windows: NVIDIA for the desktop application, any type for manual install
- macOS: Apple Silicon (M1 or later) for the desktop application, any type for manual install
- Intel-based Macs must manually install or use the desktop app in CPU mode
- Linux: Any type for manual install
- RAM:
- Windows: 16-32GB
- macOS/Linux: 8-16GB
- Storage: SSD with 50-100GB for installation, models, and output
ComfyUI can be installed in three ways:
- Desktop Application (Windows/macOS): Currently in Beta
- Windows Portable(Windows only): Standalone version for Windows
- Manual Installation(Windows, macOS, Linux): Installed by cloning repository on Github.
Desktop Application | Windows Guide | Mac Guide
1. Download the Windows or Mac executable from ComfyUI’s website.
2. Run the executable.
3. Select the GPU setup (NVIDIA for Windows, MPS for Mac)
4. Select the installation location, which should be an empty directory on an SSD with sufficient space (5GB for Mac, 15GB for Windows)
5. Optional: Migrate from an existing installation if one exists.
6. Toggle the desktop settings to user preference.
- Automatic updates are recommended.
- There should be a green checkmark next to “Mirror settings.” If there is a red x mark instead, check out the guides linked above to troubleshoot.
7. Click the Install button!
Window Portable | Installation Guide
1. Download the zip file from either the installation guide or Github.
2. Extract the contents of the zip file. ComfyUI recommends 7-ZIP.
3. To launch, choose your hardware.
- NVIDIA GPU (not 50 series (Blackwell)): Double click
run_nvidia_gpu.bat - NVIDIA 50 Series GPU: Read the system requirement information for NVIDIA 50 series on this page of the ComfyUI documentation.
4. You will see a command running in Command Prompt.
- Once you see
To see the GUI go to: http://127.0.0.1:8188, ComfyUI has started. - Do NOT close the Command prompt windows while using ComfyUI.
Manual Installation | Windows Guide | Mac Guide | Linux Guide
Manual installation works on any modern operating system with any modern GPU. The instructions and terminal commands change subtly by operating system. Detailed guides can be found in this article, the guides linked above from the ComfyUI documentation, or Github; the big-picture steps are as follows:
1. Clone the repository.
2. Install Miniconda and create and activate an environment.
- Python 3.13 is partially supported, but ComfyUI recommends Python 3.12.
3. Install the GPU dependencies based on the type of GPU you have.
4. Navigate into the ComfyUI directory and install the contents of requirements.txt.
5. Start the application by running the file main.py.
Generating Your First Image
Once the program is running either locally or remotely for the first time, you may see one of three things:
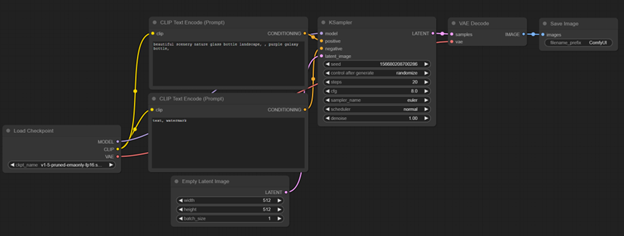
1. The default text-to-image workflow, which looks like this:
2. The template menu, where you should select the default text-to-image workflow by selecting “Image Generation.”
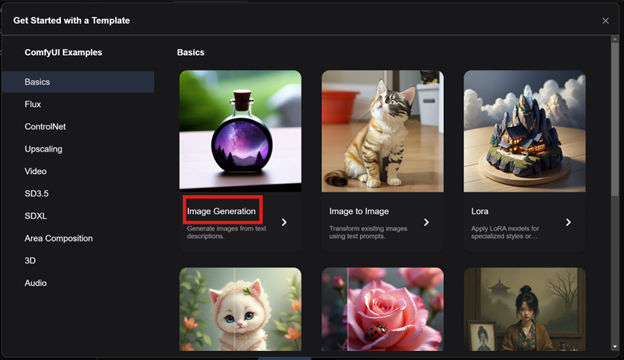
3. The blank screen with no workflow loaded. In that case, select “Workflow” > “Browse Templates” to get to the template menu, then choose “Image Generation.”
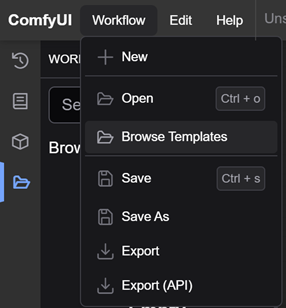
If prompted, download missing models, which are typically not included with installation. Once your screen has the text-to-image workflow on it, you can begin exploring the nodes (the rectangles), the edges (the connecting lines), and the rest of the UI.
Here are the steps to generating your first image:
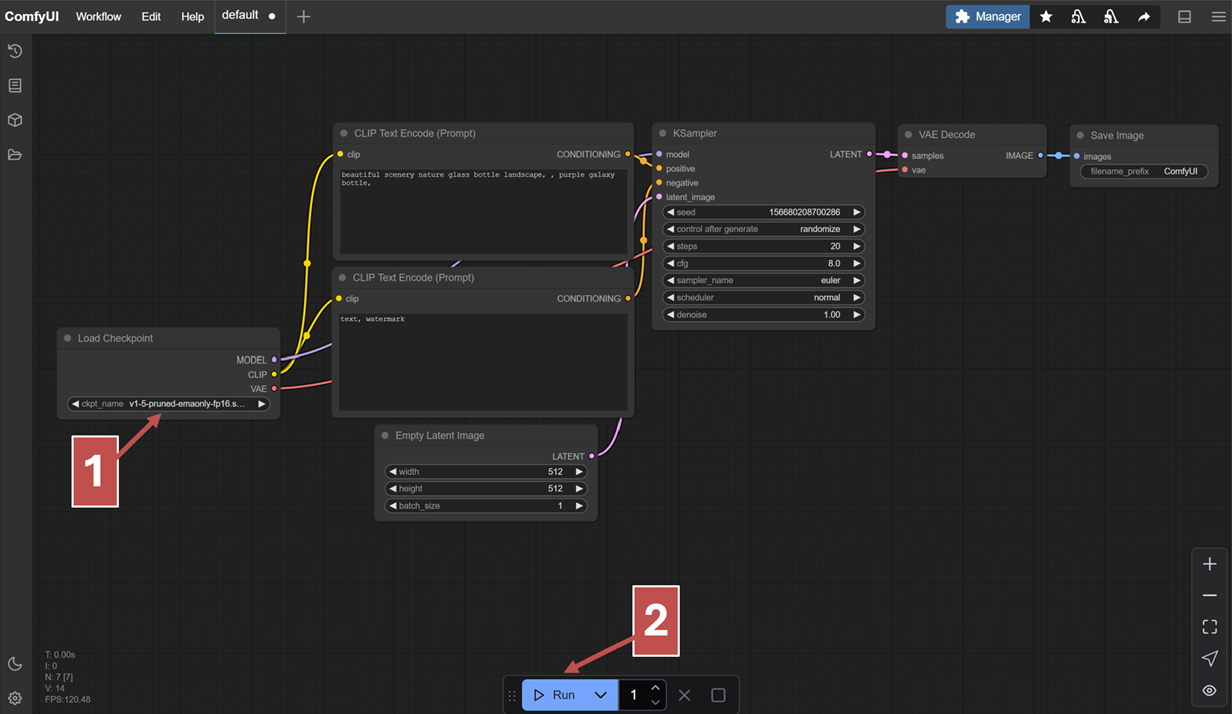
1. Ensure v1-5-pruned-emaonly-fp16.safetensors is selected in the Load Checkpoint node.
2. Click “Run” (or “Queue”) or ctrl+enter to generate the image. This example is shown from the Windows desktop application, so the Run/Queue button may be in a different location for you. Here is what the workflow looks like when an image is being generated:
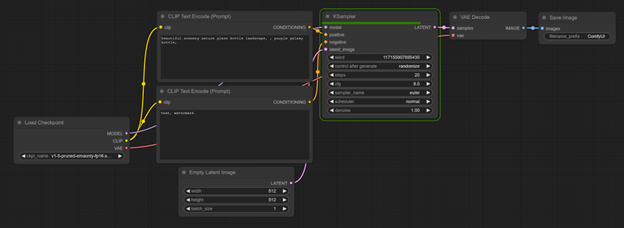
3. The result should appear in the Save Image node. Right-click to save to your device.
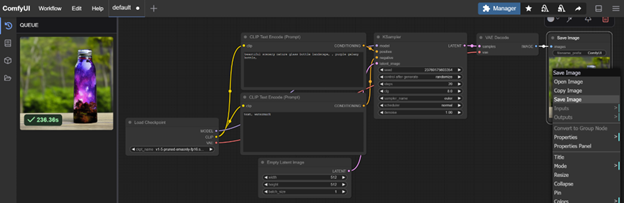
Congrats! If you can see a galactic purple bottle, everything is up and running correctly! Now let’s explore what all those nodes, tools, and other features do!
Controls and Navigation for the UI
Basic Controls
- Click and drag on the workspace background to move the workflow
- Zoom in and out with the mouse wheel or a track pad
- Click and drag nodes to move them around
- Click and drag edges to form connections between the nodes’ inputs and outputs as appropriate
Menus
Top Panel
- Workflow: Open, save, and export workflows and explore templates
- Edit: Undo, redo, clear, clipspace (internal clipboard), etc.
- Help: ComfyUI documentation and other resources
- Manager: Manage custom nodes and models
- Toggle bottom panel: Shows logs and terminal
Left Side Panel
- Queue: View and manage pending, running, and completed jobs
- Node Library: Browse available nodes; drag and drop them into the workspace
- Model Library: Browse available models; drag into loader nodes in the workspace
- Workflows: Browse and edit saved workflows
- Theme: Toggle light and dark mode
- Settings: Comprehensive settings panel to adjust UI and functionality; use Keybinding submenu to add or change keyboard shortcuts for better navigation
Nodes, Edges, and Parameters
Nodes are the rectangular blocks, edges are the lines connecting them, and parameters modify behavior. Each node has three components: inputs, outputs, parameters.
The KSampler node runs the denoising process that turns the latent image into a coherent output guided by text prompts. We’ll take a closer look at the KSampler node in the text-to-image workflow to learn about inputs, outputs, and parameters as well as a bit about the KSampler node itself:
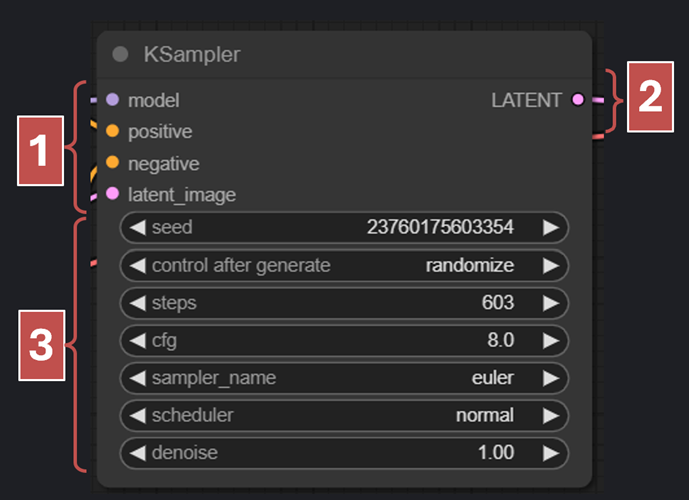
1. Inputs: Dots on the left. The Ksampler has the following inputs:
- model: the diffusion model you want to use for the generation
- positive: the text prompt including all the things you want in the image
- negative: the text prompt including all the things you don’t want in the image
- latent_image: this is the starting point that the KSampler will gradually denoise into the desired output image. For text-to-image generation, this is just random noise.
2. Outputs: Dots on the right. The KSampler has one output, the denoised latent which then gets sent to a decoding node and turned into a viewable image
3. Parameters: Items in the middle of the node. The KSampler has the following parameters:
- seed: random seed to control initial noise, which controls the final image
- control_after_generation: how to change random seed after each generation
- steps: number of sampling steps
- cfg: classifier free guidance scale, which determines how closely the final image much match the prompt
- sampler_name: sampler algorithm
- scheduler: controls how the noise should change in each step
- denoise: how much of the initial noise should be removed by denoising (1 means all noise erased)
The other nodes in the text-to-image workflow are:
- Load Checkpoint: selects which pre-trained model to use and loads it
- CLIP Text Encode (Prompt) - positive: encodes the positive part of the text prompt
- CLIP Text Encode (Prompt) - negative: encodes the negative part of the text prompt
- VAE Decode: decodes the returned latent into a viewable image
- Save Image: interact with the image, such as copy, save, rename, etc.
Exploring Other Workflows
The next workflow for newcomers to gain familiarity with the platform is the image-to-image workflow in the Templates menu. In this workflow, instead of beginning with a random initial latent to denoise, you can use the Load Image node to upload a starting point for your image generation.
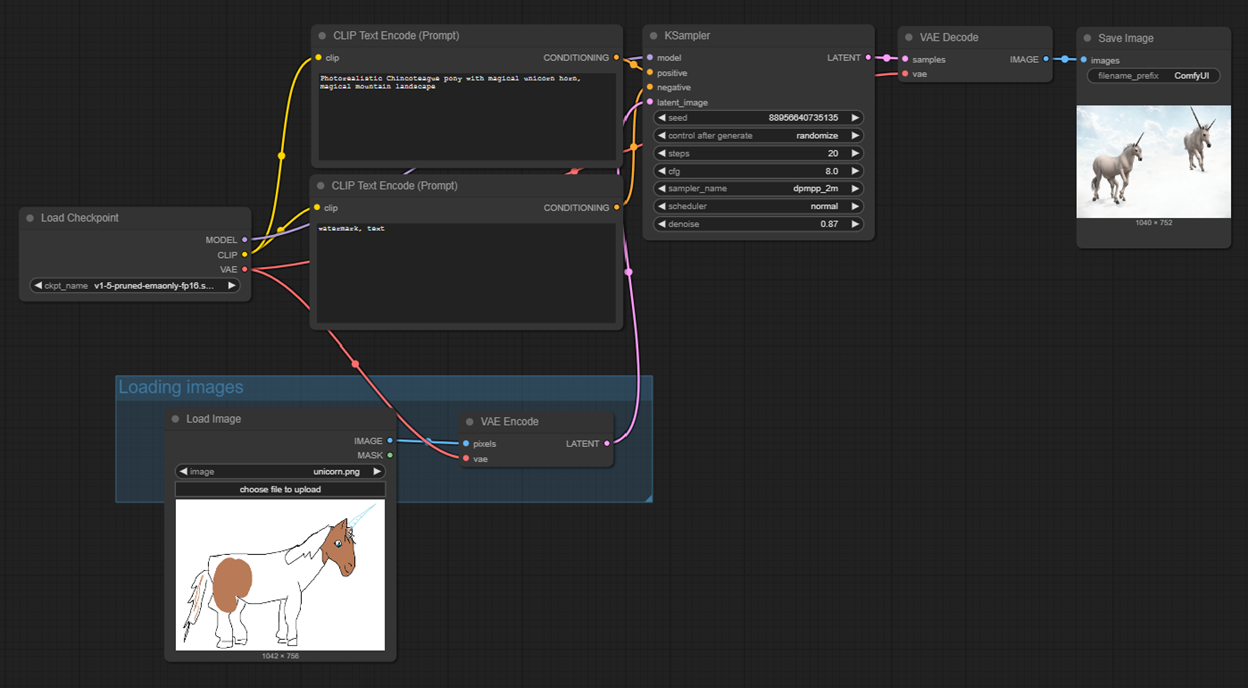
This generation is far from perfect, but it does give the perfect opportunity to experiment with different parameter values, prompts, and other common practices to improve the output.
Tips and Other Features
Below are some basic tips and features to get started on improving performance.
Adjusting parameters
Adjusting the KSampler parameters can enhance the performance drastically without a steep learning curve. A good place to start is the CFG and number of steps; typically, one wants the number of steps to be as low as possible while still producing a coherent result and the CFG to be as high as possible without reducing the image quality.
The denoise parameter is also a good option to tweak while learning how to use the platform. For image-to-image generation, a lower denoise parameter will yield images that look closer to the original image, while a higher denoise parameter will diverge more from the original image; increasing the denoise too much can produce the overly smooth or waxy quality associated with AI-generated images.
Custom Nodes
Custom nodes are user-created extensions that can specialize beyond the built-in nodes. Below are some of the community-acclaimed custom nodes to start with:
- Efficiency Nodes: combines functionality of multiple nodes to reduce number of node
- ComfyUI Custom Scripts: UI enhancements including autocomplete, viewing extra information, saving workflows as PNGs, etc.
- ComfyUI Impact Pack: features related to image enhancement such as face details
LoRAs
LoRA (Low-Rank Adaptation) is a lightweight fine-tuning method that adds small training deltas (differences) into larger models. A LoRA in the context of ComfyUI is a file that is smaller than a model and applies specialized differences to the generation, such as changing the style and themes. Essentially, it is an added “layer” to the generation process that modifies part of the output.
Below is the default LoRA template. LoRAs get loaded into the Load LoRA node and connected to Load Checkpoint, the text prompts, and the KSampler.
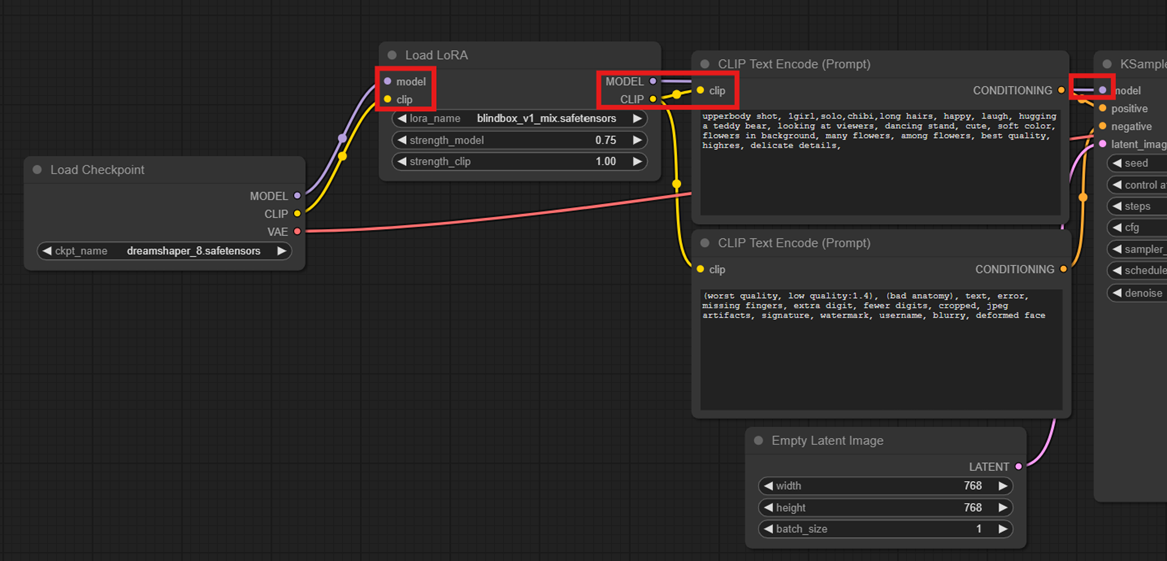
LoRAs can also be strung together in sequence to utilize many specialized modifications at once.
Takeaways and Resources
ComfyUI is a very powerful tool providing substantial boosts to productivity and clarity when working with generative AI, however the initial installation and learning how to use the UI can be tricky at first.
Luckily, the online ComfyUI community is very active producing resources and discussing best ways to use the platform. Here are some helpful resources to dig deeper into advanced features, best practices and workflows, and community advice.
- ThinkDiffusion’s Ultimate LoRA Guide
- ComfyUI Documentation and Github (especially useful for troubleshooting installation issues)
- ComfyUI Examples Github repository and pages
- r/comfyui on Reddit
ComfyUI is being maintained and updated extremely frequently, so it can also be useful to periodically check out the resources for new and upgraded features!